These 9 hidden features of the Android camera can turn you into a professional photographer
03 May 1402 at 17:50
If you have an Android phone and you are interested in mobile photography and photography with its camera, use these 9 tricks to increase the quality of your images.
Are you interested in taking selfies or taking photos at events? If your answer to this question is yes, then we must say that you are probably doing the photography process completely wrong because there are techniques and tricks for taking photos with an Android phone that few people know about. Is. Even before writing this article, I didn’t know how to take a good photo. I used to be a terrible photographer!


These 9 hidden Android camera features made my photography skills stand out to a great extent. If you are not a good photographer like me, by implementing these tricks, assign part of the photography to the phone itself. Most of the Android phones have advanced features in the camera department and you only need to use them to capture amazing photos. Stay with Gadget News.
9 hidden features to work with Android camera
No one is born a photographer. There are many things you need to know to become a good photographer, but thanks to today’s phones, the process is limited to setting a few factors on the phone. Follow the steps below to gradually see their effect on your images.
Slow motion filming
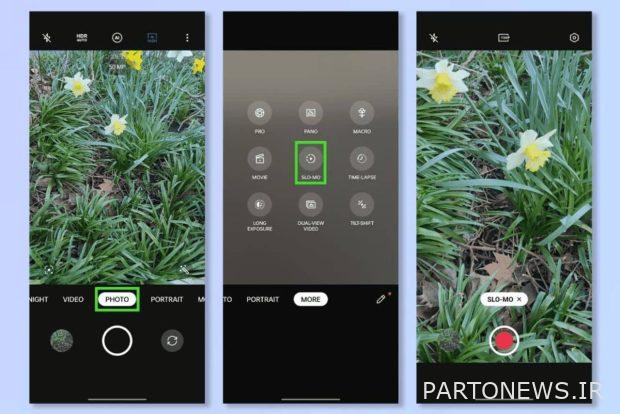
Android camera offers you dozens of features for professional filming. One of them is the possibility of filming in slow motion, which is also used to make movies with cinematic mode. Follow the steps below to activate this feature:
- Open the camera app and go to More in the camera mode section.
- Tap on the Slo-Mo option and start recording in slow motion.
Enable 10-bit color
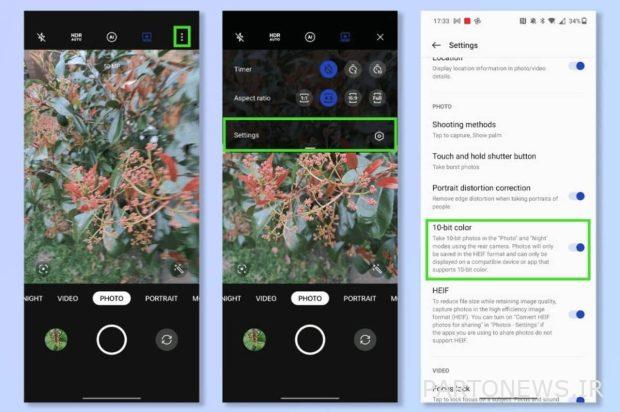
The 10-bit color shooting feature allows you to take more attractive photos. By activating this feature, it will be possible to display 1024 shades of RGB colors and you can record more than a billion unique and special colors in your photos. Meanwhile, during 8-bit shooting, only 256 modes and 16.7 million colors are available to you. To enable shooting in 10-bit mode, follow the steps below:
- Open the camera app.
- Go to camera settings.
- Activate the 10bit color feature.
Pro mode activation

Pro mode allows you to change every single element and photography factor of the camera. Sometimes, by changing these parameters, the quality of the images improves dramatically, because these settings are made by default by the Android camera itself, and the result is not always favorable. By activating this mode, settings such as white light balance, ISO, shutter speed, etc. will be available to you. Follow the steps below to activate Pro mode.
- Go to the Camera app.
- In the Camera Mode section, go to More.
- Tap on the Pro option. Now you can customize any factor you want.
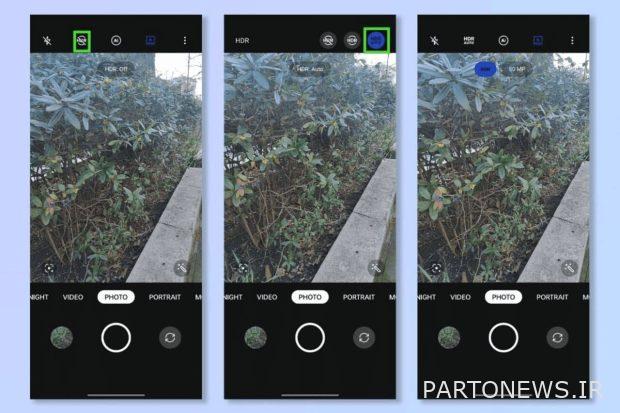
Automatic HDR
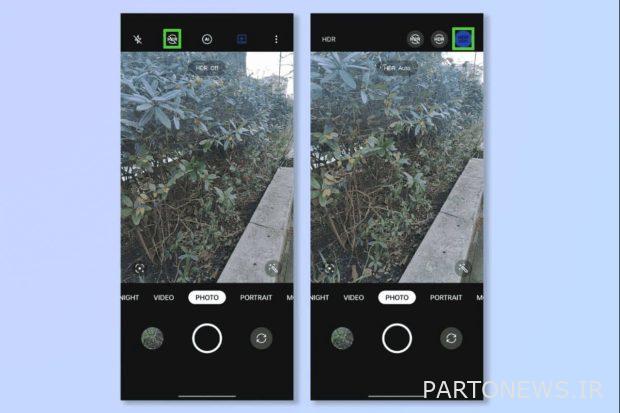
HDR, which actually stands for High Dynamic Range technology, adjusts the concentration and brightness of colors in such a way as to improve the quality of images to a great extent. Of course, if you know how to apply the settings in the pro section, you probably won’t need HDR. Since few people are familiar with professional camera settings, we will explain how to turn on HDR.
- Go to the Android camera app.
- Tap on the HDR icon, which is usually located next to the flash button.
- Now HDR is automatically turned on when necessary to increase the quality of colors.
portrait mode
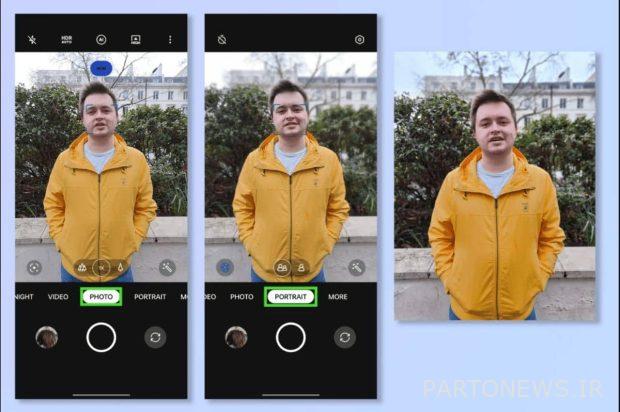
Many photographers prefer portrait mode to landscape photography during work, because the subject is properly focused and the background is naturally blurred. In this way, the details of the subject will have a better effect. You won’t have far to go to enable portrait photography:
- Go to the camera app and look for the Portrait option in the photography modes.
RAW mode
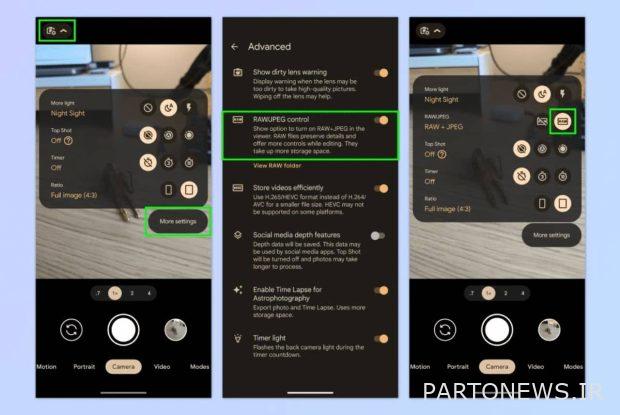
Unlike photos in JPEG format, the Android camera does not process RAW photos. The images recorded with this method may be a bit blurry because the process of image processing and editing is entirely on the user’s shoulders. This means that if you shoot in normal mode, you usually do not need to re-edit the image. RAW photos will be larger in size because they provide more data about the photo, and you can edit them professionally with programs like Lightroom or Photoshop.
Most Android phones are capable of shooting in JPEG and RAW mode. To activate this feature, you need to go to the camera settings and activate the RAW option.
Using Gridlines
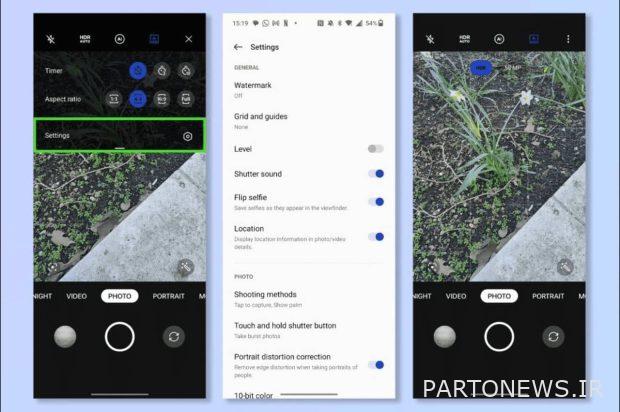
Learning how to use Gridlines can have a huge positive impact on your photos. Gridlines are grid lines on the page that divide the page clearly and fundamentally. In this way, you can place the subject in one of these areas to take a more professional photo. Keep in mind that if the subject is placed in the center of the Grid lines, the result will not be very pleasing.
You can use 3×3 lines to divide the screen and place the subject in one of these thirds. Follow the steps below to activate Gridlines in the Android camera:
- Open the camera app.
- Go to camera settings.
- In the Grids and Guides section, turn on the Grid button.
Fast camera launch

Sometimes the important and sensitive moments of life come and go in just one moment. If you have to unlock the screen first, find the camera app and then launch it and finally start shooting, that critical moment is over. The ability to run the camera quickly makes you never miss such moments and access your mobile camera as quickly as possible. This feature is activated in different phones by pressing different buttons, but usually it will deal with the volume button. Follow the steps below to enable this feature:
- Open the Android camera app and go to its settings.
- Enable the Quick Access feature.
- Now you can access the camera by pressing the volume button twice.
Quick subscription and editing
If you don’t edit and share your photos, it’s like part of your photography process is incomplete! You can quickly edit images as needed and share them on social networks. Follow the steps below to enable this feature.
- Go to the Camera app.
- Open the gallery from the bottom left corner of the screen.
- Tap on the Edit button to apply the changes you want and finally post it on social networks with the Share button.
Which of the hidden features of the Android camera did you know before? How many of them will you use in your future shoots? We welcome your views in the comments section.